Easy Chicken Salad Sandwiches

IMG_2499

photo-4

I often loathe cooking in a hot kitchen in the Summer. This is a great meal for lunch and dinner all throughout the year especially in the warm Summer months. I throw the chicken breasts in a crockpot with a little water and let it cook on low all day or on high for half the day. When I’m ready, I shred up the chicken and let it cool for a bit and then add all the other ingredients except the almonds. Those I add just before serving so they still have a little crunch! Delicious and easy!

Chicken Salad Sandwiches

4 cups cooked chicken (4 breasts of chicken)
1/2-1 1/2 cups celery (add how much you like)
2 tablespoons lemon juice
1/2 cup mayonnaise
3/4 teaspoon salt
1 cup grated cheddar cheese (I like sharp)
1/2 cup sliced almonds (You can toast them if you like)
Rolls or croissants

Shred or cube chicken. Mix in celery, lemon juice, mayonnaise, salt and cheddar cheese. Can store in the refrigerator until ready to serve. Add almonds just before serving. Great for leftovers. Serve on rolls or croissants. Serves 8.

Baked Tilapia

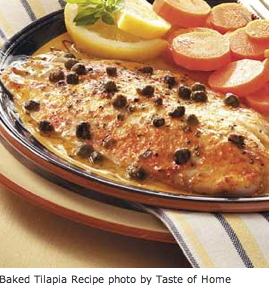
Our family loves fish! Tilapia is a very mild fish and super good for you. I found this recipe from Taste of Home at the beginning of December and we have made it many times since. First of all its super easy, few ingredients, and you can make it a head of time. My mom served it at a family Christmas party this year and got fabulous reviews.

If you have joined with the rest of us to eat more healthy this 2013, than this recipe is for you.

I usually buy my tilapia frozen in a bag out at Costco. Thaw in cold water for about 20 minutes and then remove it from the individual wrapping and place into an ungreased glass pan.  In a small bowl, combine the butter, lemon juice, garlic powder and salt; pour over the fillets. Sometimes I double the sauce for a little extra to go on some rice. Sprinkle with capers, oregano and paprika. At this point you can cover them with foil and put them in the fridge to bake an hour or two later.

IMG_1538

Bake, uncovered, at 425° for 10-15 minutes or until fish flakes easily with a fork.

Screen shot 2013-01-14 at 2.56.05 PM

Baked Tilapia

Ingredients

  • 4 tilapia fillets (6 ounces each)
  • 3 tablespoons butter, melted
  • 3 tablespoons lemon juice
  • 1-1/2 teaspoons garlic powder
  • 1/8 teaspoon salt
  • 2 tablespoons capers, drained
  • 1/2 teaspoon dried oregano
  • 1/8 teaspoon paprika

Directions

  • Place tilapia in an ungreased 13-in. x 9-in. baking dish. In a small bowl, combine the butter, lemon juice, garlic powder and salt; pour over the fillets. Sprinkle with capers, oregano and paprika.
  • Bake, uncovered, at 425° for 10-15 minutes or until fish flakes easily with a fork. Yield: 4 servings.

Posted by Andrea

Caprese Salad

Tomatoes, Tomatoes and more Tomatoes!!

It is the time of year for fresh tomatoes. I love to cook with fresh produce. It is so rewarding to cook with vegetables out of your own garden. However, my tomatoes are looking like this…

…so I am going to farmers markets to get someone else’s garden tomatoes.

They are perfectly ripe and fabulous for summer cooking!

This is a recipe that a Gourmet Dinner Friend has made and it is one of my favorites! She makes it with mini mozzarella and grape tomatoes, but I make it with cut tomatoes and slices of fresh monzarella. Both ways are delicious. The balsamic vinegar mixture is my favorite part. I could drink balsamic vinegar and with these spices and herbs mixed in, it takes it up a notch!

Blend olive oil, balsamic vinegar, red pepper flakes, garlic salt and dried oregano in a small bowl. (Preferably in one that has a lid so if you are making it for a smaller crowd you can save the dressing for another night.)

This salad in the picture was just for two. The little friends that live at our home (children) don’t always love gourmet food, but that does not mean Greg and I should not eat well. The rest of the dressing, tomatoes and mozzarella goes in the fridge for another day. This salad is perfect for my lunch the next day. Often I crave something other than a quick turkey sandwich.


Caprese Salad

16 ounces fresh mozzarella cut into slices
3 medium or 2 large tomatoes cut into thin slices
2 cup shredded fresh basil leaves

Dressing:

1 cup olive oil
6 Tablespoons balsamic vinegar
2 teaspoons red pepper flakes
2 teaspoons garlic salt
1 teaspoon dried oregano

In a small bowl blend olive oil, vinegar, red pepper flakes, garlic salt and oregano. Set aside. On large plate alternate tomato slice and mozzarella around the plat in a circle. Add additional circles within that circle till it fills up the plate. Sprinkle julienned basil over the tomatoes and mozzarella. Spoon the dressing over all of it to the desired amount.

Posted by Andrea

A BBQ Beauty!

My friend has been telling me for some time about her turkey burgers that her family loves more than a beef burger. She is a great cook, but I am quite particular about my beef patty so I was not so sure I wanted to venture into the turkey farm. Needless to say we hosted a BBQ last summer and she offered to fix her much-loved turkey burgers. All I can say is…WOW! I am hooked!

I have to start off with telling you I have made these numerous times since and I have always used ground turkey from Costco. They have always been great. Last week we did not need the party amount of turkey so Greg stopped by the grocery store and picked up Honeysuckle ground turkey. Not good! When I bit into my patty it was no longer a patty but a breast of something. The ground meat had fused together. Any who, I went back to Costco and my turkey burger was back!

So I will stop with the chit-chat and get on to the recipe so you can salivate as well. It is not really a recipe but a few key ingredients.

Break off handfuls of meat and make it into patties. Keep in mind ground turkey is very lean and so the patties don’t shrink as much. So if you make them the size of the bun they will remain the size of the bun after cooking.

Greg was grossed out at this photo! He said that no one wants to see raw burgers, but I must document it all. The good, the bad and the ugly! Now generously sprinkle the ugly patties with seasoned salt, garlic powder and McCormick Montreal Steak seasoning on both sides.

If you are not going to be eating all of the meat in one sitting I always make the patties and season them before freezing. Then they are ready to go and the meat will have absorbed all that yummy flavor. Another tip (or confession) I often don’t have fresh buns for my burgers. If you have frozen buns for hamburgers or hotdogs, take them out of the freezer while you are getting the patties ready and set them on cooling racks. On the racks the buns can thaw without getting soggy. When you are grilling the meat throw the buns on the barbecue to toast them a bit. They will taste like you just bought them! (That is unless you froze stale buns. Once they are stale, they are always stale.)

Enjoy! You can also feel good about eating a less fattening burger this Summer! Garnish them with all the best fixings! Put out a condiment caddy, avocados, tomatoes, lettuce and sautéed onions.

Posted by Andrea

The Condiment Caddy!

In Better Homes and Gardens magazine last year, there was a list of good gift ideas for friends and they featured a condiment caddy. I loved the idea and went out looking for the components to make one for myself, sister and Mom who have us over for barbeques often. I found the mustard and ketchup bottles at Dollar Tree and then the glass jars at Walmart and the clear mayo bottle at K-mart. The caddy is in the bath aisle at Target. They have different colors and some are plastic and some are metal.

In my caddy I included dill relish, yellow mustard, mayonnaise, spicy mustard and ketchup. My sister loves sweet pickles so I added an additional jar of sweet pickle relish to her caddy.

I keep the caddy with the contents in my fridge. It is ready for entertaining and also for everyday use when my kids are making turkey sandwiches or hotdogs. It is cute and useful! Who doesn’t love a useful gift?

Posted by Andrea

Quinoa with Roasted Vegetables and Goat Cheese

I was first introduced to Quinoa a year or so ago at my friend Jill’s house when she hosted us for a delicious gourmet dinner! I really liked it and soon after learned how healthy it is for you. I bought a bag out at Costco and it sat in my pantry for about six months. I kept thinking that I needed to set aside some time to learn how to cook it. Well, I am sure a lot of you cook it and you are laughing right now because you know that it is super easy! I had never taken the time to read the package, so in the pantry it sat.

Months later my cute little sister Brecken, who lives in L.A. and is a personal trainer sent me some quinoa recipes. She is always up on the latest things from fashion to health.  Anyway, I pulled out the bag of and I can tell you it is the easiest thing I have ever made. It is like cooking rice, but it always turns out perfectly!

So, in the past few months I have experimented with different quinoa recipes. The best thing about quinoa is you can really put anything in it. It’s great to make when you need to use the odds and end vegetables you have left in your fridge.

This is our favorite quinoa combination yet.

For this particular recipe I like to make the quinoa with chicken stock instead of water because I am not using any dressing so the stock gives it more flavor. Follow the quinoa package instructions depending on how many you are cooking for. I usually make a little extra because it is so good leftover. Greg and I were fighting over who got the last leftovers the other night. Bring your chicken stock and quinoa to a boil and then cover it and turn it on low for 15 minutes. That is it!

While it is cooking and then cooling on the stove, preheat your oven to 400 degrees. Grab a red, yellow, and orange peppers, mushrooms and jar of marinated artichoke hearts. (I chose to use baby Portobello mushrooms instead of the button mushrooms because I think they have more flavor.)

Cut the peppers into long strips and place them in a single layer baking sheet. Wash the mushrooms and trim off the bottoms, slice them into thirds and add them to the baking sheet as well. Slice the artichoke hearts lengthwise and place them throughout the vegetables in the sheet. They give off yummy juices as they cook. I also stir up the marinade in the artichoke jar and drizzle it over all the vegetables. It has some oil in it so they don’t dry out and it also has great flavor. Then salt and pepper the whole sheet. If you don’t have marinated artichoke hearts the other will do, just drizzle Olive Oil over the veges and then sprinkle them with some salt, pepper and Italian seasoning or your favorite herbs. (The mushrooms cook faster than the other vegetables so if you want them to be less cooked then put them on an other baking sheet and pull them out earlier. )

I love all the color! This is what the quinoa looks like when it has finished cooking.

You just fluff with a fork and then it can wait until the rest of the ingredients are done. The vegetables cook for about 10-18 minutes depending on how soft you want them. While they are cooking cut up a log of goat cheese into chunks or crumbles however you want to describe them.

Once the vegetables are done cut them into little pieces and add them to the quinoa. Then add the goat cheese and it will absorb a little into the mixture.

Mix it up and serve! So delicious! So fresh and so healthy!

Quinoa with Roasted Vegetables and Goat Cheese

1 cup quinoa
2 cup chicken stock
3 bell peppers, red, orange, yellow cut into strips
8-10 mushrooms sliced into thirds
8 ounces bottle of marinated artichoke hearts, sliced. (Use some marinade out of the jar for vegetables)
6-8 ounces of goat cheese, chopped up

Bring chicken stock and quinoa to a boil, then cover and turn to low to cook for another 15 minutes. Cut the peppers into long strips and place them in a single layer baking sheet. Wash the mushrooms and trim off the bottoms, slice them in thirds and add them to the baking sheet as well. Slice the artichoke hearts lengthwise and place throughout the vegetables in the sheet. They give off yummy juices as they cook. I also stir up the marinade in the artichoke jar and drizzle it over all the vegetables. It has some oil in it so they don’t dry out and also has great flavor. Then salt and pepper the whole sheet. If you don’t have marinated artichokes the other will do, just drizzle Olive Oil over the veges and sprinkle them with salt, pepper and some Italian seasoning or your favorite herbs. Cook vegetables for 10-15 minutes (until desired softness).

Cut up vegetables into bite size pieces. Add veges and goat cheese to quinoa. Mix all together and enjoy!

Posted by Andrea

Sunday Suppers Blog

I came across this blog called Sunday-suppers in the Better Homes and Gardens magazine. Wow! Check it out! I would love to be in attendance at one of Karen Mordechai’s beautifully set and tasty dinners. She is also the photographer, creator and stylist of Sunday Suppers.

She does have some suppers that you can buy tickets for if you are living in NYC or want to take a trip that direction.

Posted by Andrea

Harvest Dinner

One of my favorite events of the year is a Harvest Dinner that my neighbor Margaret hosts each Autumn. She invites everyone to come and bring a dish that incorporates something from their garden. I love to cook for the season so I start thinking well in advance of what I am going to cook. This year I chose a Spaghetti Squash with Lemon and Capers (by Jimmy Bradley from the Red Cat restaurant in NYC). It is a favorite Fall recipe of mine that I found a couple of years ago. I will post pictures at the end and a tutorial in the following post.

I went to Margaret’s house as she was setting up so I could take some pictures before it got dark. She is one of the most amazingly, artistic people I know. She is very detail oriented and everthing she touches becomes wonderful. She can create the most beautiful designs out of anything, literally anything!

This is the entrance to her backyard.

I love the rusted, iron medallions incorporated between the stones in the path leading to her backyard. Great touch!

She has this great vintage tea kettles and tea cups hanging throughout the yard.

Brightly colored glass bottles line the pathway as well. Brilliant!

This is one of my favorites because Margaret’s scare crow woman is wearing the boots of the season!

On her back porch she has this great nook of vintage treasures…

Gorgeous chandelier and candelabra…

Flower and fruit filled centerpieces…

The party began…

…and this is my dear friend Margaret that I admire so much!

We ate on pie tins…

Everyone brought such wonderful things like chocolate zucchini cake, caprese salad, bruschetta with heirloom tomatoes, butternut squash soup, roasted tomato soup, spaghetti squash with homemade tomato sauce, lemon curd and peach, apple and berry cobblers! It goes without saying but we were well fed.

My Spaghetti Squash with Lemon and Capers.

What ambience! Another wonderful Harvest Dinner!